On February 14th, the National Geographic Society (NGS) and DT Heritage (DT) spent a day collaboratively testing potential techniques and workflows for the preservation-grade digitization of National Geographic’s Autochromes and related mosaic-based color process glass plates.
The below resulting article summarizes initial findings of that testing, acknowledging that such findings are preliminary. It first appeared on the National Geographic Society Archives and Film Preservation blog. It is republished below with permission.
Foreword
The National Geographic Society is justly proud of many of its archival collections. Of special significance however, is the Autochrome Collection. As one of the first major collecting endeavors at the Society, it illustrates the seriousness and ambitiousness with which the Society pursued color photography in order to show the world to its members. Natural color photography, as it was termed, only became commercially available in 1907 when French brothers Auguste and Louis Lumière first marketed their 1905 invention, the Lumière Autochrome (meaning “self-coloring”).
The first natural color photograph to appeared in the NATIONAL GEOGRAPHIC just seven years later, in the July 1914 issue. It was an autochrome made by Paul Guillumette and depicted a flower garden in Ghent, Belgium. It bore no editorial relation whatsoever to the article alongside it. It was there purely to demonstrate a technical achievement: that real color photography–color in the camera, as opposed to hand-tinting–could be engraved and printed in the pages of a magazine.
Amassed over a roughly 30-year period beginning from the 1910s until the introduction of Kodachrome, the Society’s Autochrome Collection is one of the largest in the world and depicts a wide array of peoples, places, and subjects. This guest post by Doug Peterson, Head of Research and Design at Digital Transitions Cultural Heritage, describes the initial steps the Society is taking in our endeavor to digitize thousands of Autochromes. The National Geographic Society is committed to preserving, digitizing,and sharing this unique collection and we look forward to continued collaboration with Doug and the rest of the DT team.
–Renee Braden, Senior Director, National Geographic Society Archives & Library
About Autochromes and other Mosaic-Based Color Processes
This article owes a debt to the excellent book The Lumière Autochrome: History, Technology, and Preservation which the Getty Research Institute has translated into English. For those interested in Autochromes and related mosaic-based color processes, we enthusiastically recommend this book.
The Lumière Autochrome was the first widely used method for the creation of a color photograph. Here we will present an extremely crude summary that provides just enough background to understand why digitization of Autochromes warrants special consideration, beyond those typically associated with the digitization of film or other transmissive materials.
The history of photography can be very broken into eras according to the advent and popularization of different processes to create photographs. If you’re a photo historian, please forgive the oversimplification, rounding, and loss of nuance:
- ~1820s: Black-and-white only
- ~1850s: Color via Multiple Captures
- ~1900s: Color via Color Mosaic
- ~1930s: Color via Color Layers
- ~1970s: Digital
The Autochrome Lumière was the first broadly successful Color via Color Mosaic process. It used a mosaic of dyed potato starch granules layered on top of a black-and-white emulsion. The granules were dyed orange, green, or violet (similar to red, green, and blue), and then mixed, sprinkled, and then flattened into a thin layer. The light hitting the black-and-white emulsion was thereby filtered such that for a given point only orange, green, or violet light would reach the black-and-white emulsion. After processing, the color mosaic remained in place, filtering the light reaching the viewer.
While Autochrome was, by far, the most successful early color mosaic process, other similar processes (e.g. Agfa-Farbenplatte and Dufay Dioptichrome) were invented that used different methods of producing a color mosaic that would filter light hitting a black-and-white emulsion. In each case these processes are, at the microscopic level, little discrete specks of a limited number of colors (usually something reasonably close to a red, a green, and a blue) that, when viewed at normal distances, create the sensation of an image with a full range of color and tone.
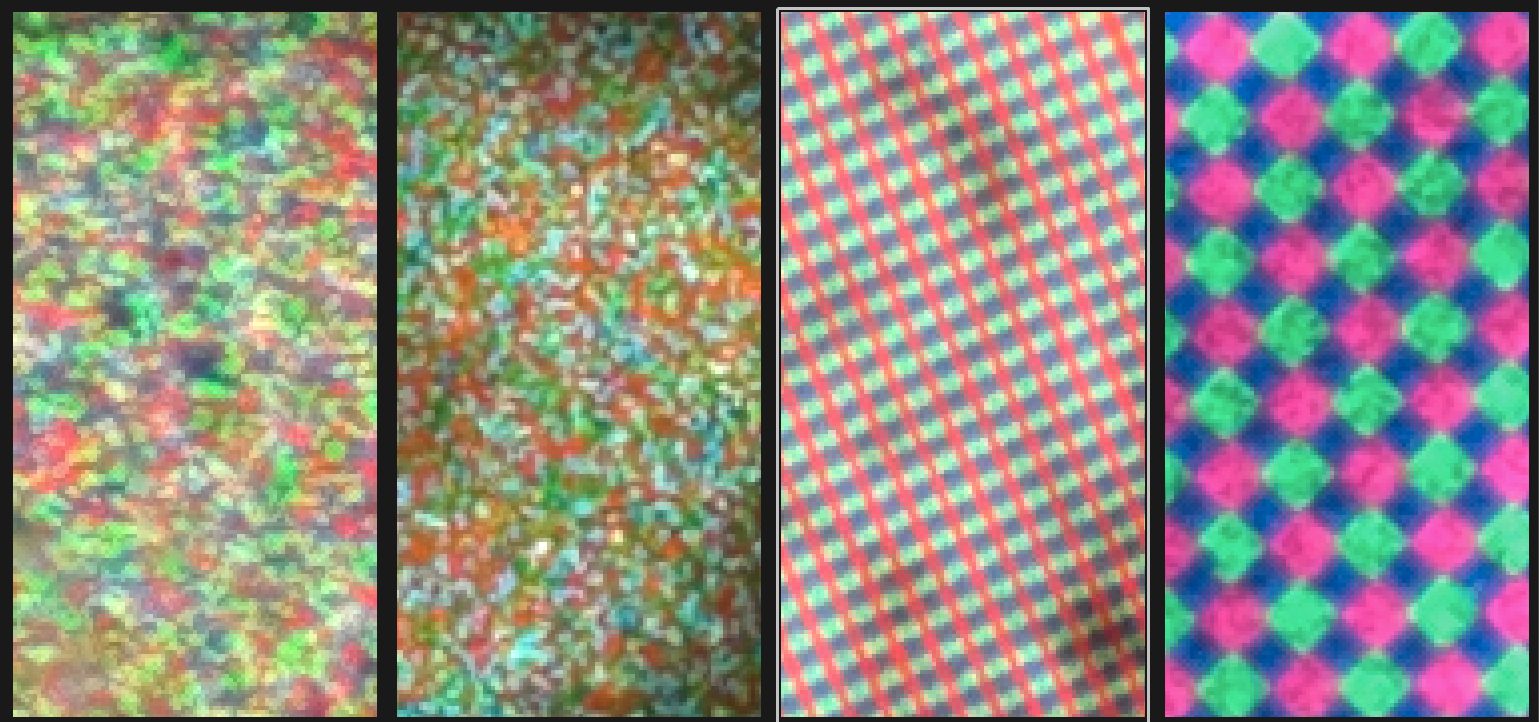
Four Color Mosaic processes captured on the DT Atom at 4400ppi. From left to right: Agfa Agfacolor, Autochrome Lumière, Dufay Dioptichrome, and Thames-Finlay
Photographers at the National Geographic Society captured many mosaic-based color images between 1914 and 1946, and its archive holds a collection of between 13,000-14,000 such plates. Such photographic collections suffer from various forms of deterioration (even when well cared for) making their preservation-grade digitization an urgent priority.
Digitization: Challenges and Solutions
Color mosaic process materials are a type of transmissive material; that is, they are viewed primarily by transmissive light coming behind/under the material toward the viewer. DT has written the DT Digitization Guide: Transmissive Materials that can be downloaded here and provides a framework and vocabulary that will be used here. As a short summary of that document, DT recommends transmissive digitization result in three distinct derivatives:
- Object Reproduction: A digital file that presents the object exactly as it would appear in person.
- Content Reproduction: A digital file that presents the image content contained within the subject.
- Speculative Artist’s Intended Rendering: A recreation of what the artist would have intended the end product of the object to be.
Within this framework, the Autochrome and other color mosaic processes present a unique combination of challenges, especially regarding the Object Reproduction.
Capture Resolution: Object Reproduction and the Dye Cloud
In a glass plate made by a color-mosaic process, the underlying nature of the physical object is discrete specks of a limited number of colors. If the glass plate is not captured at a high-enough resolution, the digital file will seem to have continuous tone and color, which would be a fundamentally unfaithful reproduction of the original object, and would rob the viewer of the unique and interesting nature of that object. Worse, it could lead a viewer to misunderstand the object; a researcher savvy about Autochrome and related processes might assume an image was not from an Autochrome if it exhibits smooth color and tone. To accomplish a true preservation-grade object reproduction of an Autochrome the object must be digitized such that each color granule is clearly visible; it must look like an Autochrome.
The challenge is that for some color-mosaic processes the size of the granules is very small while the object itself is often quite large (relative to other transmissive materials), which in turn means a very high resolution must be used to capture it. How do we know how much resolution is enough? Either mathematically or by practical testing.
Capture Resolution: The Mathematical Method
To determine the appropriate capture resolution mathematically, we start with the size of the granules, and select a PPI that results in a pixel smaller than the granule size, ideally at least twice as small. This might seem abstract at first but both the underlying concept and the math itself are quite approachable.
Conceptually, a pixel is the smallest thing we can see in a digital file, so if the pixel is larger than the size of the granule we won’t be able to distinguish individual granules at all. And if we want to clearly define the granule as a shape (and not just a point) then we want at least two pixels across each granule. The size of an Autochrome granule is given in The Lumière Autochrome: History, Technology, and Preservation as ~15 microns, which calls for each pixel to be no larger than 7.5 microns.
One pixel per 7.5 microns translates to ~3400ppi (if you don’t want to do the math longhand, WolframAlpha is glad to do it for you). Said differently, capturing at 3400 pixels per inch, each pixel is 1/3400th of an inch, which translates to ~7.5 microns. Note that this shouldn’t be considered a hard pass/fail line; it’s not that imaging at 3395ppi will lead to poor results and 3405ppi will provide stellar results. In fact The Lumière Autochrome: History, Technology, and Preservation details the highly mechanical means by which the granules of an Autochrome were produced, which resulted in natural variation in the size of the granule, so even the 15 micron size of an Autochrome granule, used as the seed for our calculations, is an approximation. Still, this calculation provides a valuable theoretical starting point for a desirable capture resolution.
Capture Resolution: The Practical Testing Method
The testing run on February 14th was done at 4400ppi using a DT Atom 100mp system. This resolution was expected to be higher than required, but was used so that lower resolutions could be created by downsampling (decreasing the resolution in software via interpolation). This is not a perfect approach, as downsampling from a higher PPI results in slightly better quality than imaging directly at that PPI. However, for a preliminary test it provided the ability to generate samples from a variety of different color-mosaic materials in the time we had. At 4400ppi, each pixel represents around 6 microns.

In the animated GIF above the same section of Autochrome (measuring roughly 3/16” across) is displayed at increasing PPI. At 500ppi and 1000ppi only the vague clumping of color is visible with the constituent granules being totally obfuscated. By 2000ppi the individual granules are hinted at, but their shape is not well defined. At 3000ppi the shape of the individual granules are mostly defined, with the 4000ppi and 4400ppi captures simply adding additional clarity to the definition of that shape. Based on these practical tests, our evaluation is a resolution of between 3000ppi and 4000ppi is warranted. Therefore this practical testing for the Autochrome roughly matched the mathematical method (which estimated ~3400ppi).
Capture Resolutions: How to Achieve High PPI on Large Objects
Based on the results of the mathematical and practical methods let’s assume the digitization of Autochromes is done at 3400ppi.
To digitize a 5×7 inch plate at 3400ppi requires a total of ~24,000 x 17,000 pixels (see Wolfram Alpha calculation) or 408 megapixels. That is more resolution than can be achieved from any single-shot camera available today, which means one of two techniques must be used: multishot (sensor moves 4, 6, or 16 times per capture) or stitching (subject moves between captures).
One major limitation for the multishot approach is that it requires that both camera and subject are completely static. This makes multishot very sensitive, as even slight vibration (for example someone walking down the hall outside of the digitization lab, or air from a vent across the room) will cause problematic movement. Multishot also has a limited maximum resolution since such cameras come with a fixed shot-pattern (e.g. a 6-shot cycle). In this case, even the highest resolution multishot camera is not quite enough for our desired 3400ppi capture.
In contrast, stitching is very resilient against minor vibration and has no maximum resolution. For stitching vibration only needs to be low enough for a fraction of a second, rather than the entire multishot capture cycle. Regarding resolution, if more resolution is needed additional captures can be made. Most of the time only 2 or 3 shots are required, but additional shots can be added to increase resolution without any hard limit; even stitching hundreds of frames is possible, albeit with commensurately long capture and stitching times. For these reasons stitching is strongly preferred.
For our testing on February 14th, a 3400ppi capture using a 9-shot stitch was executed using the DT Atom with iXG 100mp that the National Geographic Society currently owns. Since only one such stitch was done during the day, it was stitched using Adobe Photoshop’s Photomerge. If this had been a production run of many stitches then the DT BatchStitch tool would have been more efficient.
Notably, using one of DT’s new 150mp systems the same 3400ppi capture could have been achieved in a 4-shot stitch, which is considerably faster to execute than the 9-shot stitch completed on February 14th. Alternatively, with a 150mp system, a 9-shot stitch could be done at 5000ppi.
Illumination: Amount
The DT Digitization Guide: Transmissive Materials suggests that Object Reproductions call for setting the exposure/brightness of the capture based on the light source rather than the subject matter within the material. By following this recommendation digitized objects can be compared directly to each other, even when one is much denser (less translucent). Autochromes present an especially large challenge in this regard in that the layer of potato starch is not nearly as translucent as the clear parts of modern film emulsions. That is, Autochromes are dark. The Lumière Autochrome: History, Technology, and Preservation gives the transmission of an Autochrome as 7.5%. Many flatbed scanners and small-format general-purpose cameras cannot handle such dense transmissive material.
However, the DT system has a 16-bit medium format sensor with wide dynamic range, and even the denser shadow areas of the Autochrome frames tested are easily captured within that dynamic range, even when the exposure is set based on the light source.
This is especially valuable when an item has been damaged in such a way that an uncoated part of the glass is revealed. For example, note the indicated areas in the Autochrome below where the protective edge wrapping of the Autochrome has fallen off, revealing uncoated glass. Because the exposure has been set based on the illuminant the uncoated glass is captured in full detail, including some unusual patterns that could be of interest to a conservator.
Note that during our testing on February 14th we did not adhere strictly to the guidance of setting the exposure based on the illumination source, as we had not yet confirmed that the dynamic range of the system was sufficient for this dense material.
[baslider name=”Dynamic-Range-Illustration”]
Illumination: Collimation
In The Lumière Autochrome: History, Technology, and Preservation the authors make reference to using a collimated light source for digitization of Autochromes: “Illumination in the form of optically collimated light rays can create a significant increase in the contrast and the color saturation of an autochrome image.” (p. 224) During our February 14th testing we compared results from a DT Photon which is a non-collimated CH-specific light source and a Metaphase collimated LED.
Notably, the testing was done with a 2×2” version of the Metaphase collimated light. That meant that direct comparisons could only be made on parts of the plate (since the entire 5×7” plate was not illuminated by the smaller light). Because some of the frame was entirely unilluminated we were unable to even field the collimated light captures using the Capture One CH LCC tool; instead we used a positive vignette, which is a crude substitute in this case but brought the two results close enough to compare the relevant image attributes.
We examined the results from the two light sources for any difference in sharpness that might arise from the differing lighting geometry; no difference was observed.
As indicated by The Lumière Autochrome: History, Technology, and Preservation, the collimated and non-collimated light source led to different levels of contrast and color saturation. Specifically the collimated light source produced a higher contrast and saturation than the non-collimated light source. As an experiment we used standard levels adjustment (black point and white point only) to match the contrast of the two captures, judged both visually and by examining the resulting histograms. Our finding is that an extremely similar end product could be achieved by capturing with uncollimated light and making a small adjustment to levels. Notably the same type of adjustment is what would typically be made when generating a Speculative Artist Intended Rendering derivative per the suggestions of the DT Digitization Guide: Transmissive Materials.
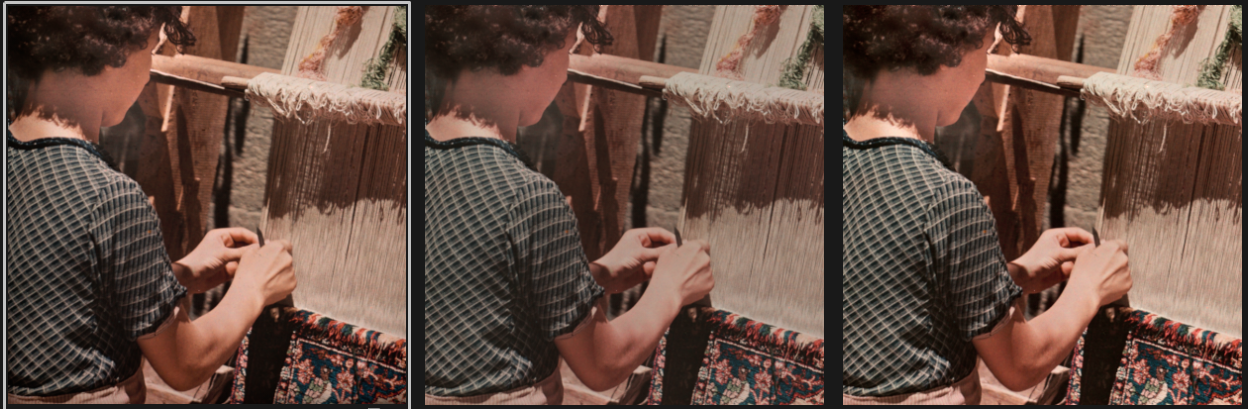
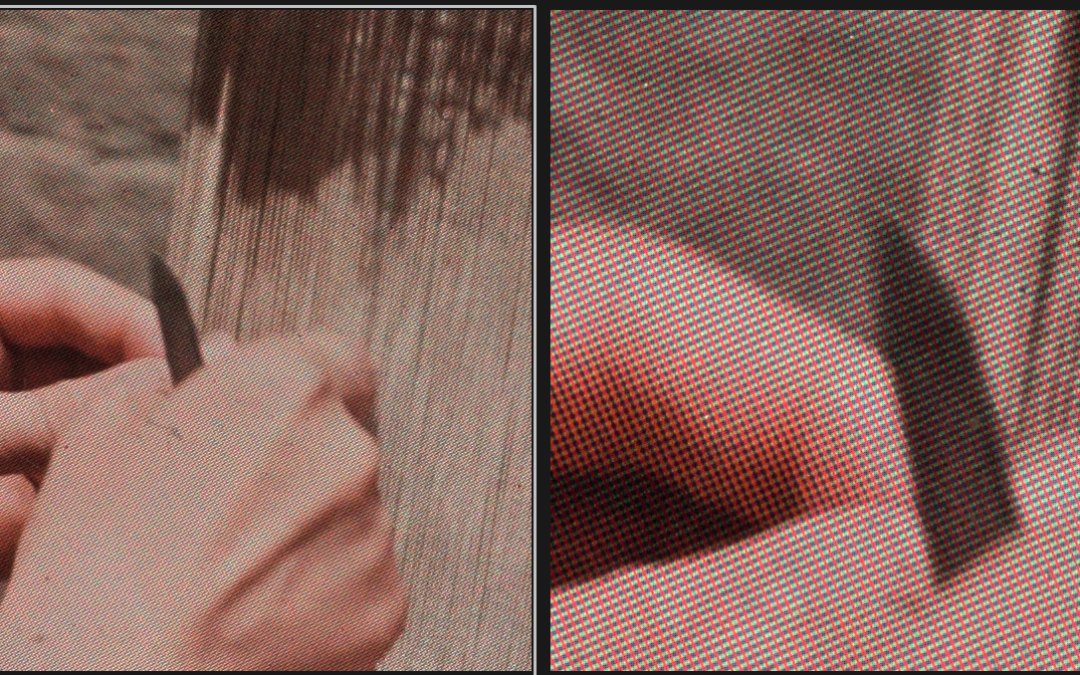
A Dufay Dioptichrome by Robert Moore. Left: Collimated light without adjustment. Middle: DT Photon without adjustment. Right: DT Photon with levels adjustment
Which type of light is “truer” to the object? That’s a complex question, since it depends on how the original physical object was intended to be used. According to The Lumière Autochrome: History, Technology, and Preservation a variety of methods were used to view Autochromes. The Metaphase collimated light source would correspond more closely to a method such as a projector, but less closely to a method such as holding the Autochrome up to a window. Moreover, it’s worth considering whether the projectors of the time would have produced as high of contrast as a modern collimated light source placed immediately behind the object; any imperfections in a projector’s optical path or receiving surface quickly reduce contrast.
Requiring a collimated light source is a considerable practical burden. A 12” square Metaphase LED and appropriate power source is roughly $4000, and would be limited in use to this niche of transmissive material, since a non-collimated light source is the accepted practice for general transmissive collections. Moreover, we were not able to find a light source that was both collimated and could match the very high spectral/color quality of the DT Photon, which has a CRI and CQS of 98. Metaphase claims a CRI of only 70 for the specific model we used, though we did not independently evaluate this.
From a conservation point of view, using a collimated light source means that any physical holes or cracks will only be shown if light has a clear path through the object as seen directly from above. Take for example the circular crack in the Autochrome by Joseph Rock, which is shown below with collimated and non-collimated light. The main crack line is visible in both captures, but the non-collimated light source reveals a series of offshoots from that main crack.
[baslider name=”Illuminationcrackb”]
Transmissive and Reflective Lighting
The DT Photon LEDs of the DT Atom system provides for both reflective and transmissive lighting. We used this capability to test whether raking light could be used to record the physical condition of the object for conservation purposes. The findings were strongly positive.
The DT Atom provides a 16-bit raw file which can be heavily manipulated before it shows tone or color degradation, noise, or other artifacts. Below, we used the even fielding tool in Capture One CH (named LCC) to even out the overall illumination, and then levels, curves, clarity, and structure to visually enhance the image. Such edits are non-destructive in the raw workflow. They are meant here to visually enhance the various damage to and contaminants on the object. It would be advisable to keep both forms of this image (the accurate/literal capture and the visually enhanced rendering).
[baslider name=”Agfa-CourtellemontGervaisFrance-4400ppi-Reflective-DTPhoton”]
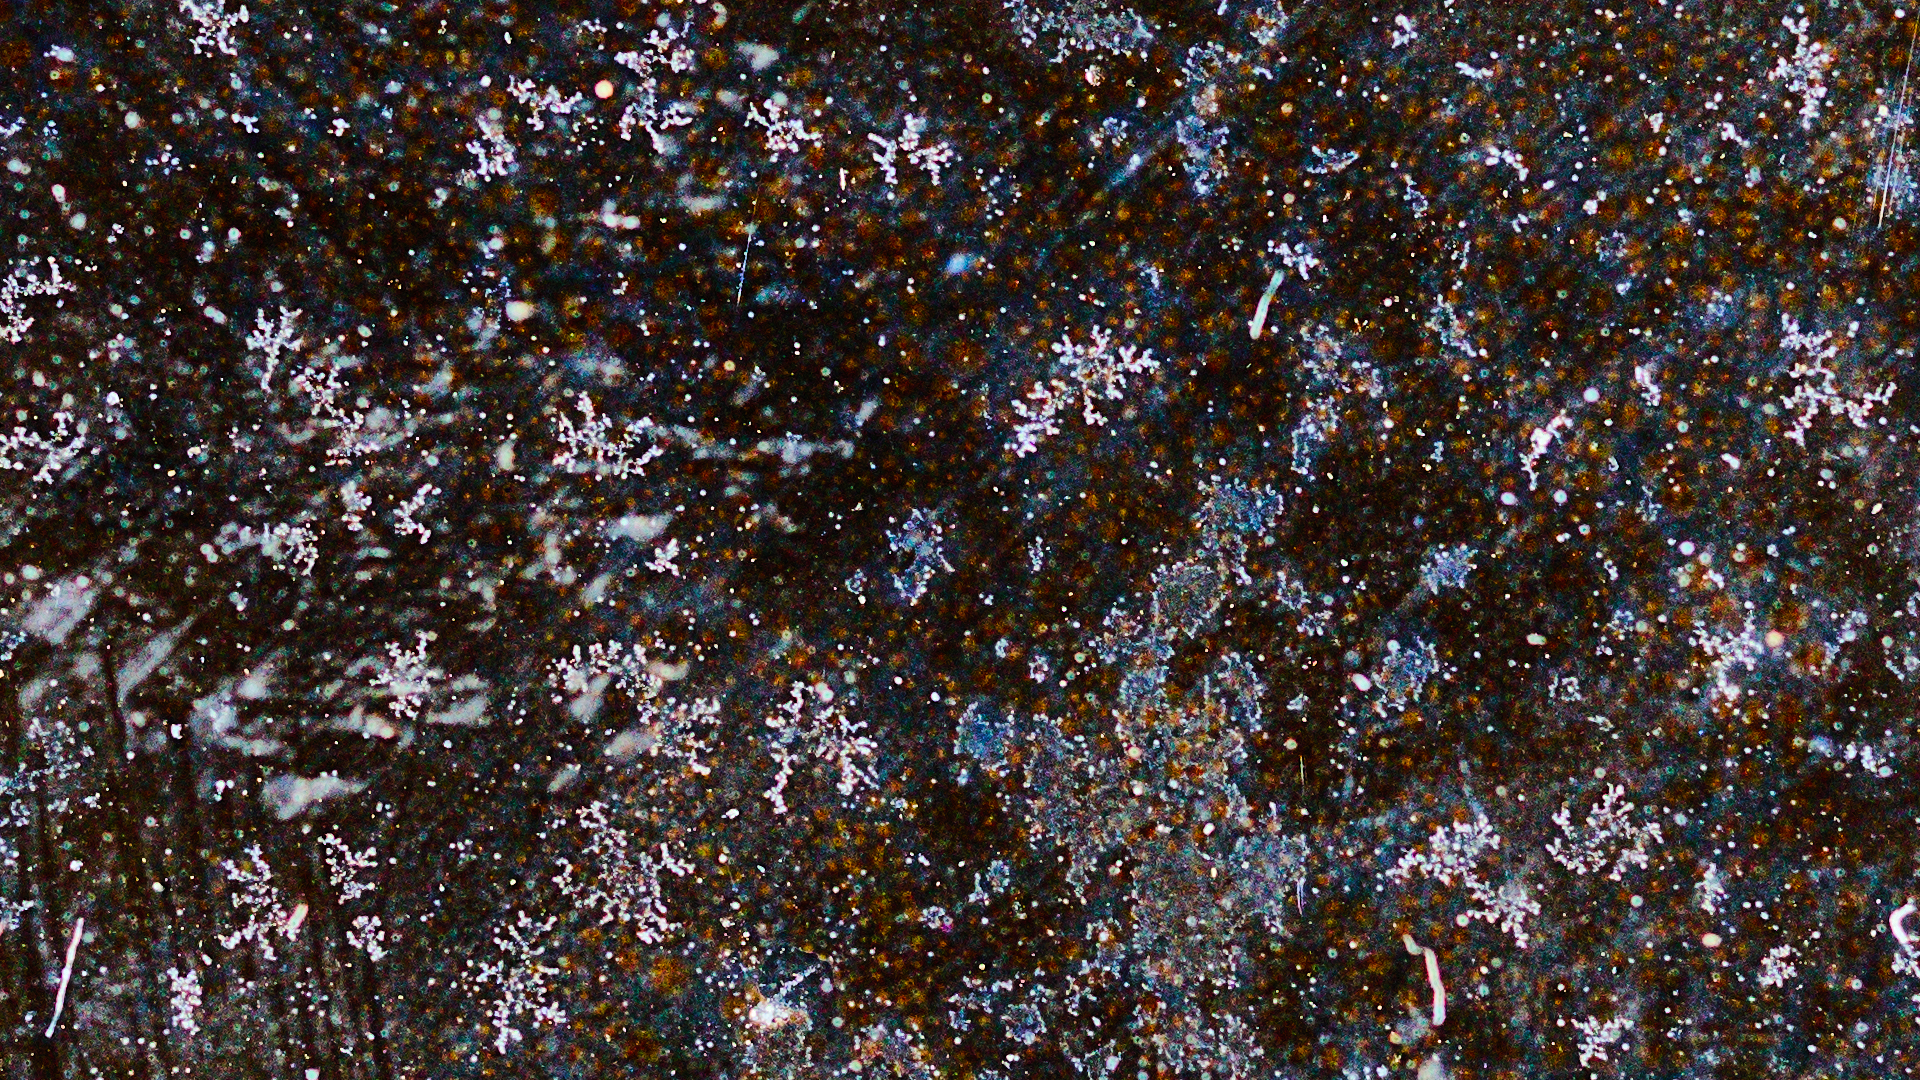
The high resolution means that much about the contamination can be seen from a single capture of the entire object. Here is a 100% resolution crop showing the snowflake-like contaminants (with significant visual enhancement). Normally this level of detail would require use of a microscope, which would limit the field of view to a very small section of the object. Here, we have instead captured several inches of the object, while providing microscope-level detail.
With DT’s new 150mp system even more detail would be recorded. Alternatively, another capture could have been made at an even higher PPI to provide more detail if conservation needs warranted; up to around 10,000ppi is possible with some of DT’s systems.
Ramifications of a Mosaic
There are several unusual ramifications of the image being formed by a mosaic of discrete color granules.
Tools like Adobe Photoshop’s Healing and Cloning brushes struggle to maintain a natural result on images made of a color mosaic. These tools were designed to work on continuously-toned images and the texture and color of a color mosaic causes quirks in their behavior. Of course, this is a minor concern to most Cultural Heritage institutions since the object is typically displayed with whatever damage or imperfections it has.
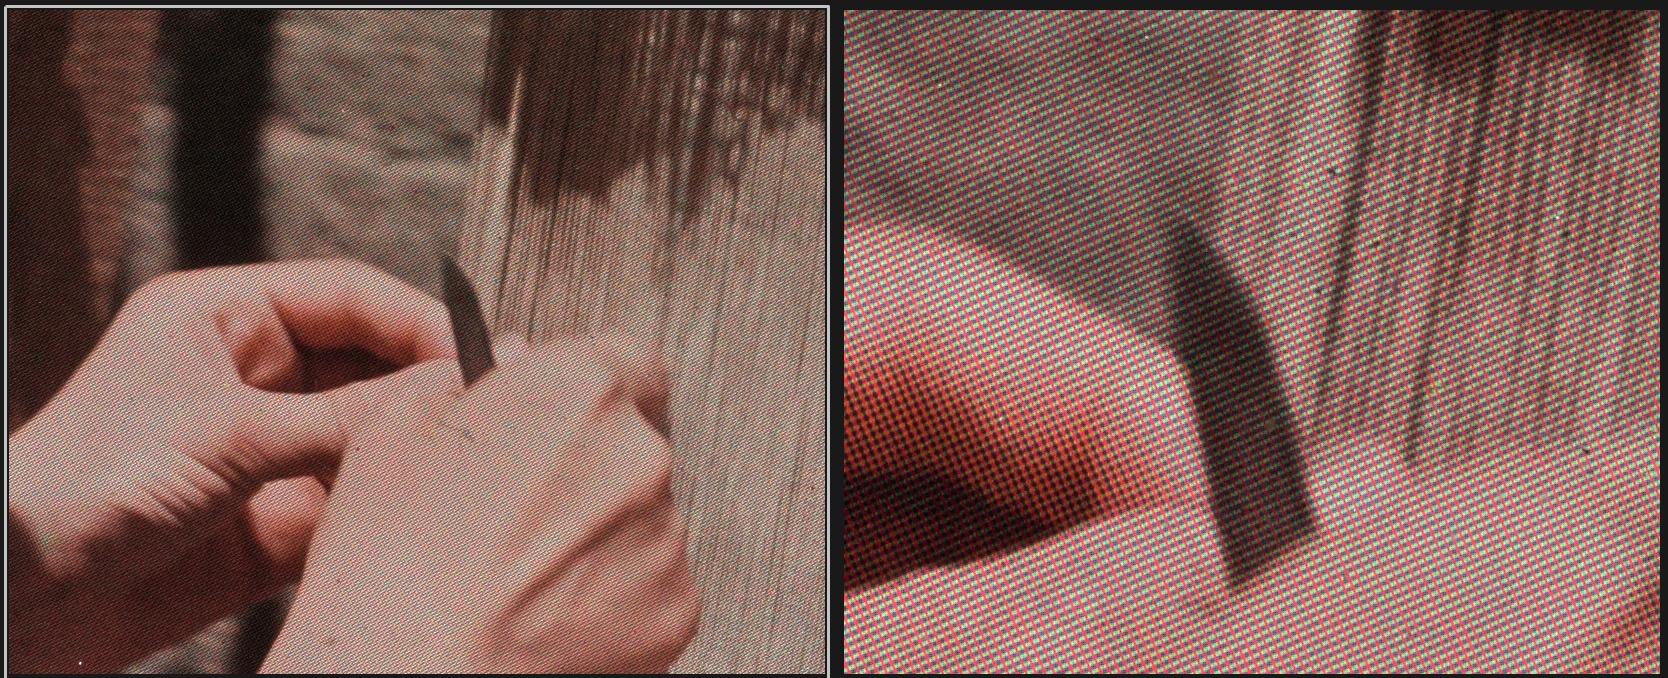
In processes such as the Dufay Dioptichrome the dye is aligned in a precise grid pattern. The sensor in a modern digital camera is also a precise grid pattern. When two repeating patterns align they can form an interference artifact called moire. This can cause undesirable “waves” of color or false tone patterns. The solution to moire is simple: you must capture the subject matter at a higher resolution. Below is an illustration of a Dufay captured at 1600ppi (each pixel is 16 microns) and at 4400ppi (each pixel is 6 microns). The 1600ppi capture exhibits a slight moire pattern, and not only fails to show the true nature of the object, it actually misrepresents the nature of the object as the moire creates the feeling of a different pattern than is actually present.
Note that false-moire can also appear in digital image files when they are viewed at a magnification other than 100%. That is, the file itself can be free of moire, but moire appears in the photo viewer (e.g. Photoshop or Preview) when it is displayed at zoom-to-fit or another less-than-100% setting. If the moire does not appear at 100% then no action needs to be taken.
Parting Thoughts
Departing from the detached technical style of the rest of this article, I’d like to share my personal thoughts on the experience of working with National Geographic Society on this testing.
My training is as a photographer (BS in Visual Communication: Commercial Photography at Ohio University). There are few names as immediately and viscerally pleasant to a photographer’s ears than National Geographic. When DT Heritage was asked to consult as digitization experts our first experience was a tour of their photographic archive; the experience was dazzling. In those storerooms are original film from countless photographers of remarkable people and places over the entire span of the history of color photography. Every trip to work with National Geographic has been magical, and this trip was no exception.
That National Geographic Society photographers were early adopters of the first widespread color process is not at all surprising. But the emotional impact of seeing this era of our world’s cultural heritage captured in color cannot be understated. We are simply unaccustomed to seeing events such as Civil War veterans revisiting Gettysburg shown in color. If I told you there were photos of soldiers who served in the United States Civil War, coming together to commemorate Gettysburg, you would assume the images are black and white. Indeed a Google Search returns almost no color images other than hand-colored monochrome images. Something about seeing this event in color makes that history feel intimately close in time to today. It’s perhaps a human failing or lack of imagination that relegates events of the monochrome era to the “distant past” and any event in the color era to “not so long ago” but the emotional impact of muddling this divide is profound enough to have spawned a feature film.
Photographer: Orren Louden
The technical challenges of digitizing these early processes have, so far, meant very little of have been digitized at a preservation grade of quality. Given the myriad manners of degradation and decay that threaten transmissive collections the urgency to digitize them is very high. Playing a very small part in the very large project to digitize these materials is an absolute honor for DT Heritage as an entity and for me personally.
I can’t wait to see the treasures this project uncovers.
About Doug Peterson
Doug Peterson is the Head of R+D and Product Management at DT Heritage. In 2007, Doug received a BS, with honors, in Visual Communication from Ohio University, a school with deep faculty ties to National Geographic. He has worked on myriad digitization projects, such as the Library of Congress’ FSA Collection, the Walt Disney Archives, and the Center for Creative Photography (home of Ansel Adams’ and Edward Weston’s archive). In May, Doug and his wife are expecting a baby girl, adding to a household currently dominated by Sophie, their chubby cat.